Creating a GPX route from scratch without a mobile app
No existing track for where you're headed? Here's how to build a complete GPX file starting from a blank map, right in your browser.
Why start from a blank map
Not every outing follows an already-marked route. A new neighbourhood to explore by bike, your own variant of a familiar trail, a training run that needs to be exactly 42 km: in these cases, there's no GPX track to download anywhere. The only option is to build it yourself.
In GPX Edit Pro, that build happens directly on a map, with nothing to install and no account to create.
Dropping the first waypoints
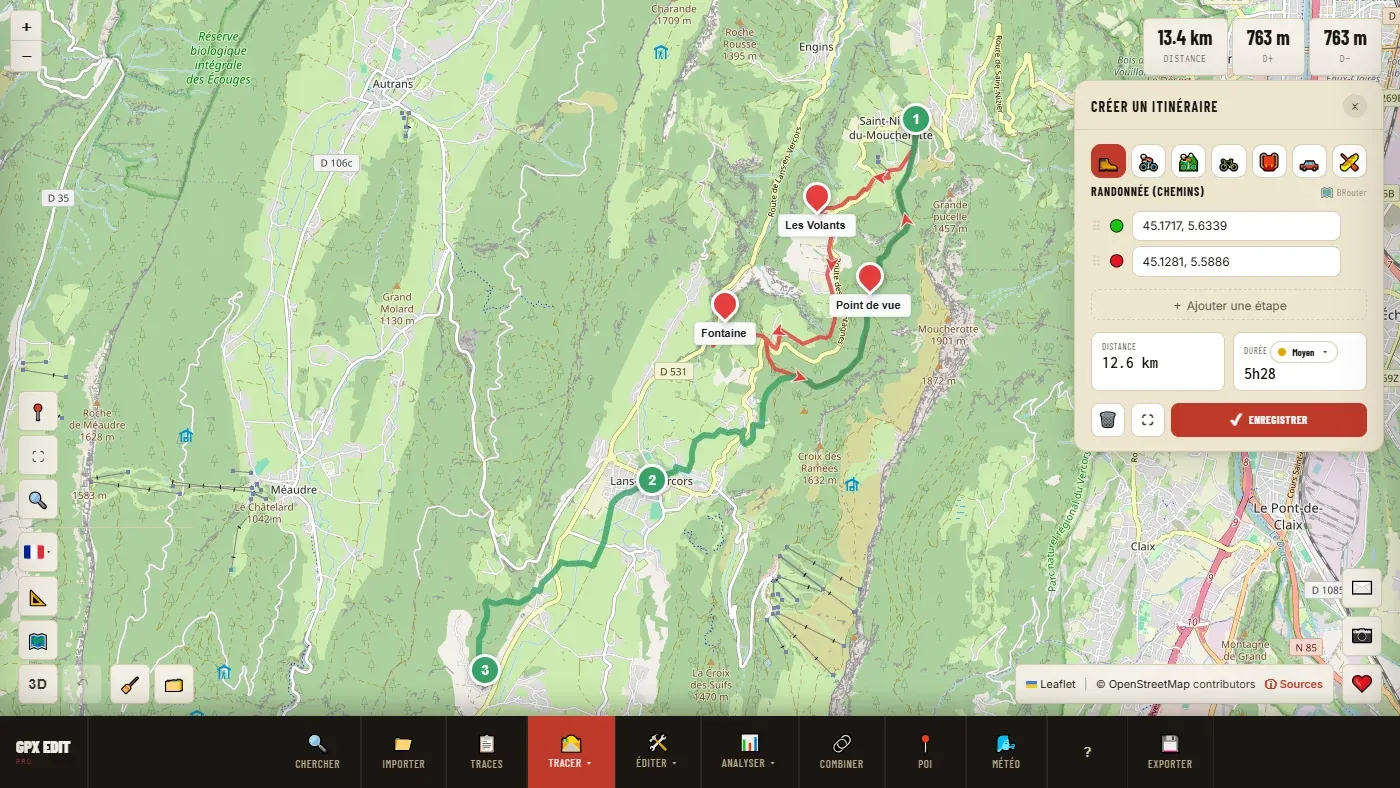
The basic idea: every click on the map adds a waypoint. Between two points, a path appears automatically — not a straight line, but a real route calculated by a routing engine that knows the existing roads, cycle paths and trails.
Routing runs on BRouter, which knows the roads, cycle paths and mapped trails. The suggested path follows what actually exists on the ground, not a theoretical line between two points.
Adding a point in the middle of a segment forces a detour; removing it automatically recalculates the track between the two remaining points.
📖 Step by step in the manual: Via routing · Freehand · Extend a track
Picking the right travel mode
The calculated path depends on the profile you choose: hiking, road cycling, MTB, gravel, bikepacking, car or waterway. A road cycling profile favours surfaced roads you can ride on narrow tyres; an MTB or hiking profile allows narrow trails and unsurfaced tracks. Note: changing the profile recalculates the whole route with the new profile. For an outing that changes in nature, for example a section on foot in the middle of a bike route, draw each part with its own profile, then merge the tracks.
Areas with no mapped network
Some stretches exist in no map database at all: a beach, a stretch of water for kayaking, an off-trail section in the mountains. For these, pure free-hand drawing lets you draw directly without routing, switching freely between the two modes within the same route.
Checking the elevation profile before you go
Some sections don't exist in any map database: a beach, a stretch of water for kayaking, an off-trail section in the mountains. For these cases, the "Freehand" mode draws directly, without routing. To combine the two, save the calculated part, then extend it freehand (Freehand, then "Extend this track"), or merge two tracks.
Checking the track on a satellite view
The standard map background shows mapped trails, but not always their real-world condition. Switching temporarily to a satellite view lets you spot a path overgrown with vegetation, a missing bridge, or a section that no longer matches recently changed terrain — useful before confirming a route through a rarely-used or recently altered area.
Splitting an overly long route into stages
For a multi-day trip, there's no need to plot each stage separately from the first point. It's often simpler to build the whole route in one go, then split it afterwards at the planned overnight stops — one click on the map or the elevation profile splits the track into two independent files. Splitting at regular intervals (every 30 km, say) also generates several stages at once without placing each one by hand. See the guide on planning a multi-day trip for how to enrich each stage afterwards with food and accommodation markers.
Common mistakes when drawing from scratch
Three pitfalls come up often:
- A point dropped on the far side of an impassable obstacle. A river with no bridge, or a railway line between two points, can trigger a detour of several kilometres with nothing to flag it — only a glance at the actual path, not just the total distance, reveals it.
- The wrong profile. A route calculated for road cycling avoids forest tracks: it follows a parallel road instead of the path you wanted. Choose the profile before placing the points; if you change it afterwards, the whole route is recalculated.
- Forgetting to save. Until you click "Save", the route is only a draft: it doesn't appear in the track list and the export finds nothing. Elevation, on the other hand, is added automatically from a terrain model: the ascent of a calculated or drawn route is reliable.
Naming, adding markers and exporting
Last step: name the route, optionally add markers at specific points (a water source, a junction not to miss), then export. The resulting GPX file is compatible with the main GPS computers and watches on the market — Garmin, Wahoo, Suunto, Coros, Polar — as well as Strava and Komoot for direct import. For a group ride or a track meant to be printed, an A4 PDF road book can be generated instead of a plain GPX file.
Ready to try it on your own track?
Open the GPX editor for free →